Instagram Flash Filter AI Photo Editing Prompt – Here is how to perform this kind of luxurious editing in Gemini. Let me show you. First, open Google Gemini. Now, you need to upload your reference image—specifically the half-body image I mentioned earlier. Upload it, and then paste the prompt. I have already sent you the prompt in the article; simply paste it here. Next, click on the “Generate” or “Edit” button. Once done, you will see that you receive an excellent output. If you don’t get the desired result on the first attempt, you can try two or three more times to ensure you achieve a truly outstanding result.
Details Of Instagram Flash Filter AI Photo Editing Prompt
The “Cinematic Flash” filter is a viral effect that transforms your photograph to look as if it were taken using a direct flash. It creates the impression that a flashlight has been shone directly onto the subject’s face, while the surrounding colors are converted into a cinematic palette—specifically, high-contrast lighting is added to the image. This effect highlights skin tones, while the background often appears slightly overexposed or underexposed. For these very reasons, these types of photos have become a major focal point of public interest—particularly when people showcase “before-and-after” comparisons of their own images, a trend that is garnering significant popularity.
Why Is This Filter Going So Viral?
Why are people loving it so much? For starters, it offers a distinct aesthetic unlike anything you’ve seen before. You can transform even standard mobile photos into professional-looking shots. It delivers a high-contrast effect that illuminates your face, effectively drawing all the attention—which would otherwise be focused on the background—directly to your features. You could call it “Reel-friendly” or even “Instagram-friendly.” Indeed, anyone currently using it—whether to upload content or to share editing tutorials—is seeing their photos go viral.
How to Use Filter On Instagram?
I will also explain how those who have access to this feature on Instagram can use it. If you wish to apply this filter on Instagram, simply open your Instagram profile. Navigate to the ‘Stories’ option and select a photo from your gallery. Once you have selected a photo, look at the right-hand side of the screen, where you will find several options. Among these, you will find a ‘Hairstyle’ option. Please note that while this feature is available to many users, it may not be available to everyone; those for whom it is not available can follow the AI-based method instead. However, for those who do have access to it, simply tap on the ‘Hairstyle’ option. There, you will find a series of filters labeled ‘Flash 1’, ‘Flash 2’, ‘Flash 3’, and so on. You can select any one of these to apply the filter. That is how you can apply this filter.
Apply a strong direct flash effect with high exposure and harsh lighting.
Increase contrast and sharpness significantly.
Add cool cyan/blue tones to shadows while keeping highlights slightly blown out.
Skin tones should appear bright and slightly washed with a glossy flash look.
Boost whites and reduce midtones for a punchy, high-fashion aesthetic.
Add subtle noise and grain for a raw camera flash feel.
Background should look darker and metallic with reflections enhanced.
Overall look: paparazzi flash, night photography, bold, dramatic, Instagram restyle "flash" filter style.
Apply a strong direct flash effect with controlled exposure.
Increase contrast deeply with rich blacks and slightly crushed shadows.
Add cinematic teal tones in shadows and warm orange tones in highlights (teal & orange look).
Reduce overall brightness slightly while boosting color depth and saturation.
Skin tones should remain warm, natural, and slightly glossy.
Enhance texture and sharpness while keeping a soft highlight glow.
Add subtle vignette and light grain for a cinematic feel.
Background should appear darker, moody, and slightly desaturated with metallic reflections.
Overall look: deep cinematic flash photography, dramatic, rich colors, Instagram restyle flash + cinematic blend.

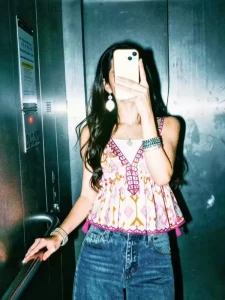
A high-contrast mirror selfie of a woman with long dark wavy hair. She is wearing a dusty blue off-the-shoulder long-sleeve crop top and high-waisted black trousers. She is holding a smartphone with a decorative case in front of her face, obscuring it. She stands against a vibrant red brick wall under a harsh overhead light that creates deep shadows and a cinematic film-noir vibe. The photo has a slightly grainy, 35mm film aesthetic with visible flash-glare and a cool-toned, moody atmosphere
Process Of Creating Flash Filter Effect
Let’s understand the current process—specifically, how to execute it. It’s actually quite simple. You have been provided with a variety of distinct prompts; you will notice slight variations across them—for instance, some might feature “Flash 1,” others “Flash 2,” “Flash 3,” and so on, incorporating different color schemes. What you need to do is simply select the prompt that appeals to you the most and copy it. Next, scroll down to find the “Create Image” option, which will redirect you to Google Gemini. You can utilize tools like Google Gemini or ChatGPT for this task; both are excellent choices and yield outstanding results. Once you arrive at the platform, begin by pasting the prompt you copied earlier. Then, click on the “+” icon to upload your photograph. Ensure that the photo you upload here is the final version you wish to use. Upload it, hit the “Generate” button, and within just a few seconds, a fantastic image will be ready for you.
Conclusion
Before you begin editing, keep a few things in mind: Whenever you’re starting address editing, in both cases, you need to understand that the background, clothes, or anything else in the already prepared photo won’t be changed. Just the colors and lighting will be changed, making it a professional photo. Therefore, whenever you edit this, add your professional photo and then edit.